ใน ep ที่แล้วเราได้เรียนรู้การนำโมเดลที่เทรนจากบน Server มาแปลง Convert ไปเป็น JSON เพื่อไปใช้บน Web Browser
แต่ในการใช้งานส่วนใหญ่เรามักไม่ต้องการ Image Classifier ที่มี Output 1000 Class ดัง MobileNet ที่เทรนกับ ImageNet เรียบร้อยแล้ว ดังนั้นเราจะใช้วิธี Transfer Learning โมเดล MobileNet ตัดหัว Classifier ทิ้ง แล้วมาเทรนต่อด้วยชุดข้อมูล Dataset ขนาดเล็กของเราเอง ที่มีแค่ 3 Class เท่านั้น
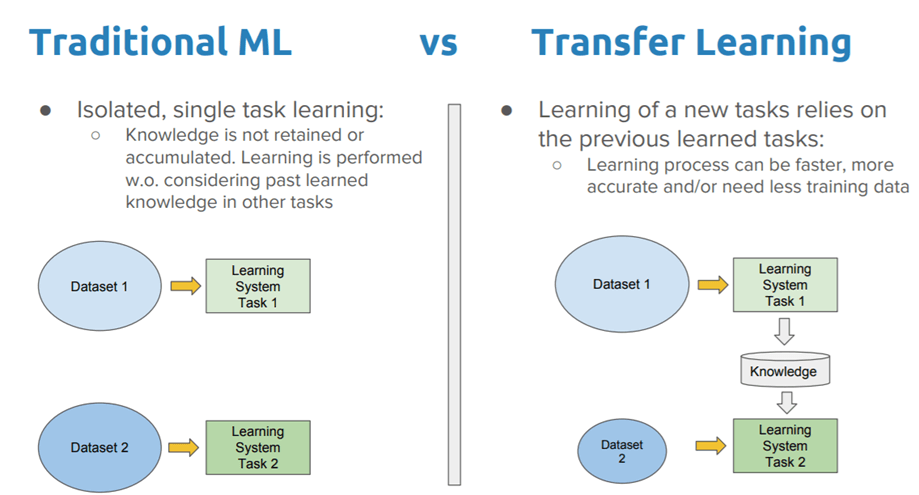
Transfer Learning คืออะไร
โมเดล Deep Learning หลาย ๆ ตัวที่เราใช้อยู่ มีความซับซ้อน มี Parameter (Weight) จำนวนหลายล้านตัว การเริ่มต้นเทรนโมเดล Deep Learning ที่ซับซ้อนขนาดนี้ ตั้งแต่ต้น (Weight Initialization ด้วยค่า Random) ต้องใช้ทั้งข้อมูล Dataset ขนาดใหญ่ พลังการประมวลผลมหาศาล และเวลาหลายวันจนถึงหลายสัปดาห์
Transfer Learning คือ เทคนิคที่ช่วยลดเวลาการเทรนโมเดล Deep Learning ด้วยการนำบางส่วนของโมเดลที่เทรนเรียบร้อยแล้ว กับงานที่ใกล้เคียงกัน มาใช้เป็นส่วนหนึ่งของโมเดลใหม่
การใช้งาน Transfer Learning
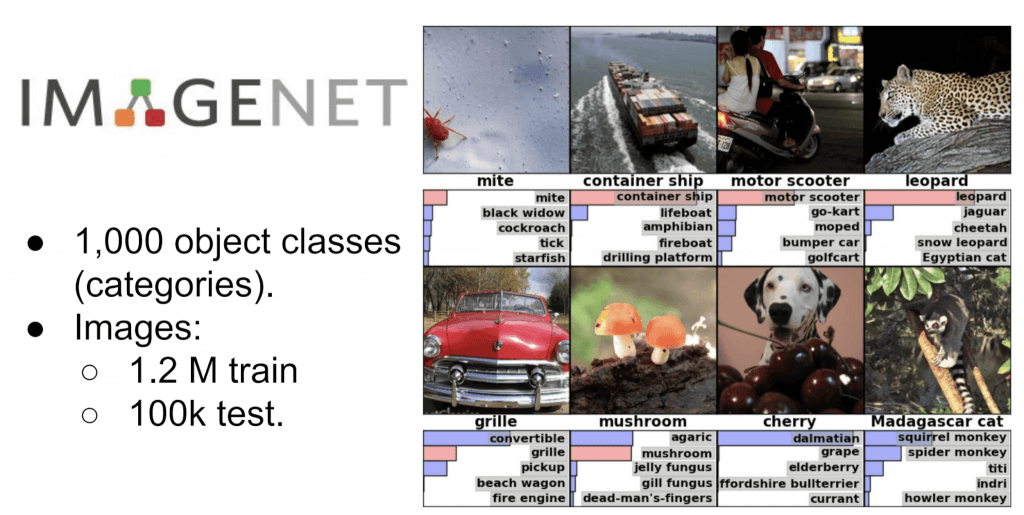
ในทางปฏิบัติ มีคนจำนวนน้อยมากที่เทรน Convolutional Neural Network ตั้งแต่ต้น เนื่องจากไม่มีชุดข้อมูล Dataset ที่ใหญ่พอ ดังนั้นคนส่วนใหญ่จึงใช้วิธีนำโมเดล ConvNet ที่เทรนกับชุดข้อมูล Dataset ขนาดใหญ่ (เช่น ImageNet ที่มีข้อมูลตัวอย่างจำนวน 1.2 ล้านรูป ประกอบด้วย 1000 หมวดหมู่)
นำโมเดลนั้นมาเป็นโมเดลตั้งต้นเพื่อเทรนต่อ กับ Dataset ขนาดเล็กในงานเฉพาะทาง หรือ ใช้สกัด Feature สำหรับงานที่ต้องการออกมา
การใช้ Transfer Learning ส่วนใหญ่ แบ่งเป็น 3 แบบดังนี้
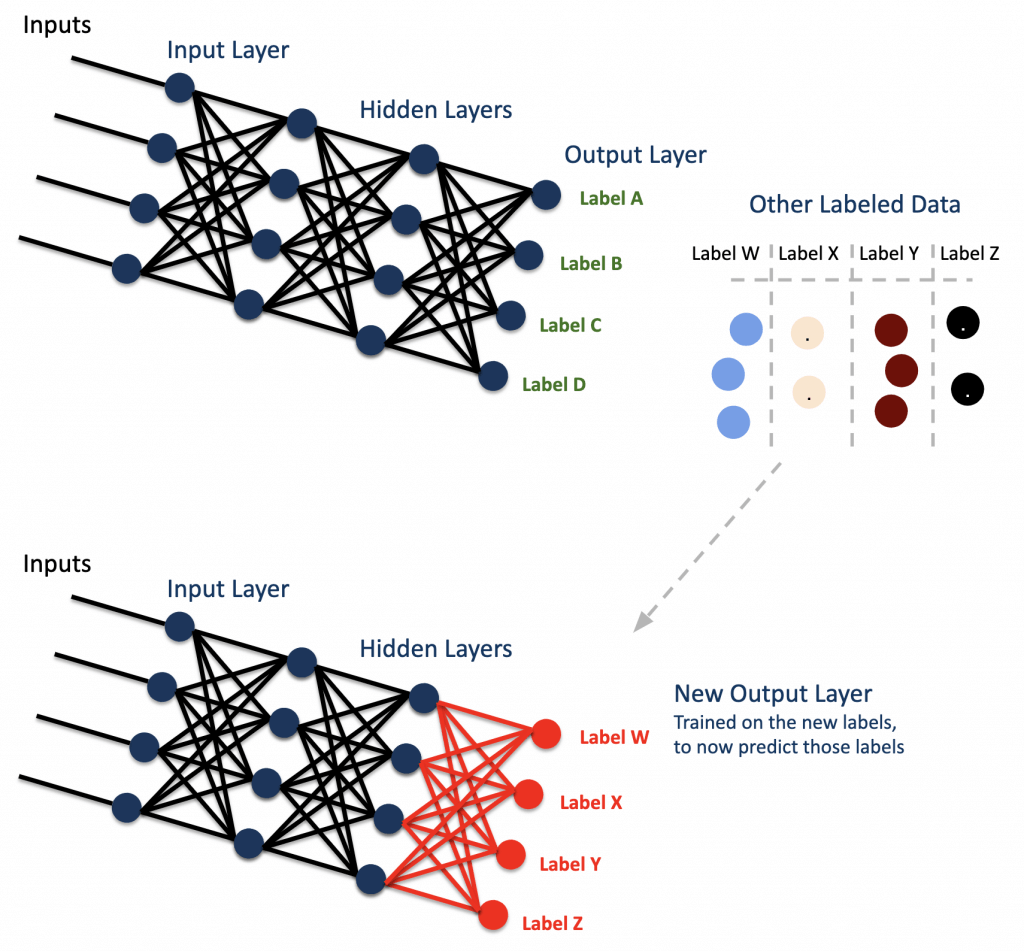
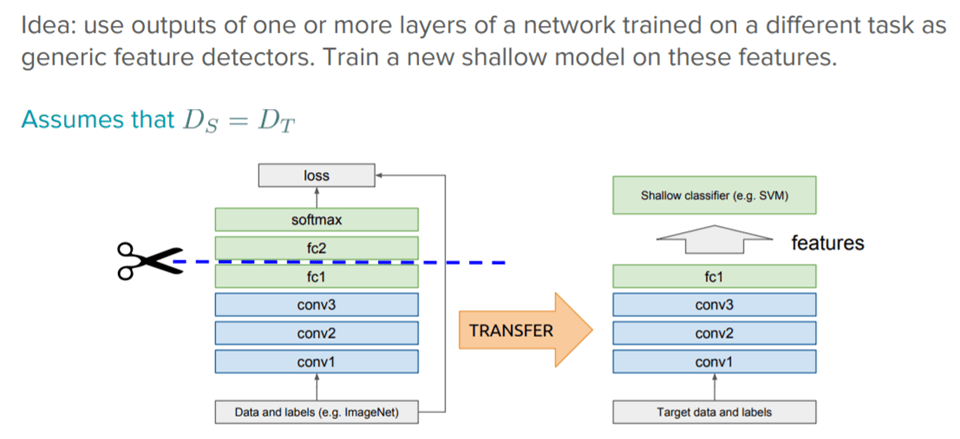
- ใช้ ConvNet เป็น Fixed Feature Extractor – นำ ConvNet มาลบ Dense Layer สุดท้ายออกไป เราจะได้ Feature Extractor ที่เราสามารถสร้าง Linear Classifier (Head) เทรนให้ Classify Feature เหล่านี้ สำหรับงานใหม่ กับชุดข้อมูล Dataset ใหม่ที่มีขนาดเล็กกว่ามาก
- Fine-tuning โมเดล ConvNet – แทนที่เราจะเทรนเฉพาะ Head เราสามารถ Fine-tuning ทั้งโมเดล ConvNet ทุก Layer เพื่อให้ได้ประสิทธิภาพที่ดีขึ้น กับงานใหม่ และ Dataset ใหม่
- Pretrained models – เนื่องจาก ConvNet สมัยใหม่ ต้องใช้เวลาเทรนที่ยาวนานประมาณ 2-3 สัปดาห์ บนเครื่อง Server ความเร็วสูง ที่มีหลาย GPU จึงมีผู้นำ Pretrained models โมเดลที่เทรนเรียบร้อยแล้ว มาแชร์กันในอินเตอร์เน็ต ให้ผู้อื่นได้ใช้ เรียกว่า Model Zoo
TensorFlow.js Code Example
เริ่มต้นด้วยใส่ Code ด้านล่าง ไว้ระหว่าง HTML tag head และ body โค้ดนี้เป็นการโหลด TensorFlow.js, โปรแกรมจัดการ Webcam จาก Google, โค้ดจัดการชุดข้อมูล Rock-Paper-Scissors Dataset และ โปรแกรมหลักของเราที่อยู่ใน retrain.js
10j_retrain.html
<script src="https://cdn.jsdelivr.net/npm/@tensorflow/tfjs@latest"> </script>
<script src="js/webcam.js"></script>
<script src="js/rps-dataset.js"></script>

<script src="js/retrain.js"></script>
โค้ดสำหรับแสดงภาพที่ถ่ายได้จากกล้อง Webcam
<video autoplay playsinline muted id="wc" width="320" height="320"></video>ปุ่มสำหรับถ่ายภาพ พร้อมกำหนด Label
	<button type="button" id="0" onclick="handleButton(this)" >Rock</button>
	<button type="button" id="1" onclick="handleButton(this)" >Paper</button>
	<button type="button" id="2" onclick="handleButton(this)" >Scissors</button>
Label นับจำนวนข้อมูลตัวอย่าง Class ต่าง ๆ และ ผลลัพธ์ prediction จากโมเดล
	<div id="rocksamples">Rock Samples:</div>
	<div id="papersamples">Paper Samples:</div>
	<div id="scissorssamples">Scissors Samples:</div>
	<div id="prediction"></div>
ปุ่มสั่งให้เริ่มต้นเทรนโมเดลจากข้อมูลตัวอย่างที่เก็บมาจาก Webcam ด้านบน, ปุ่มเริ่มต้น predict และ ปุ่มหยุด predict
	<button type="button" id="train" onclick="doTraining()" >Train Network</button>
	<button type="button" id="startPredicting" onclick="startPredicting()" >Start Predicting</button>
	<button type="button" id="stopPredicting" onclick="stopPredicting()" >Stop Predicting</button>
retrain.js
ประกาศตัวแปร และ Initialize ค่าต่าง ๆ, Dataset, รวมถึงผูกค่ากับ HTML Element ในหน้าเว็บ
let mobilenet;
let model;
const webcam = new Webcam(document.getElementById('wc'));
const dataset = new RPSDataset();
var rockSamples = 0, paperSamples = 0, scissorsSamples = 0;
let isPredicting = false;
ประกาศฟังก์ชัน โหลดโมเดล MobileNet v1 พร้อมตัด Layer สุดท้ายทิ้งไป เพื่อเตรียมทำ Transfer Learning
async function loadMobilenet() {
  const mobilenet = await tf.loadLayersModel('https://storage.googleapis.com/tfjs-models/tfjs/mobilenet_v1_0.25_224/model.json');
  const layer = mobilenet.getLayer('conv_pw_13_relu');
  return tf.model({ inputs: mobilenet.inputs, outputs: layer.output });
}
ฟังก์ชัน train เทรนโมเดล ประกอบไปด้วย
- สร้าง Neural Network 2 Dense Layer โมเดลใหม่ เป็น Head สำหรับรับ Output จาก Headless MobileNet ด้านบน ไป
predict3 Class ที่เรากำหนด - Adam Optimizer ด้วย Learning Rate = 0.0001
- Categorical Cross Entropy สำหรับ Multi-class Classification
- เทรน 10 Epoch
async function train() {
  dataset.encodeLabels(3);
  model = tf.sequential({
    layers: [
      tf.layers.flatten({ inputShape: mobilenet.outputs[0].shape.slice(1) }),
      tf.layers.dense({ units: 100, activation: 'relu' }),
      tf.layers.dense({ units: 3, activation: 'softmax' })
    ]
  });
  const optimizer = tf.train.adam(0.0001);
  model.compile({ optimizer: optimizer, loss: 'categoricalCrossentropy' });

  model.fit(dataset.xs, dataset.ys, {
    epochs: 10,
  });
}
ฟังก์ชัน handleButton ที่ควบคุมปุ่มกด เพิ่มผลลัพธ์ของการ predict จาก โมเดล Headless MobileNet เข้าไปยัง dataset เป็นข้อมูลตัวอย่าง พร้อมนับจำนวน เพื่อเตรียมไว้สำหรับเทรนต่อไป
function handleButton(elem) {
  switch (elem.id) {
    case "0":
      rockSamples++;
      document.getElementById("rocksamples").innerText = "Rock samples:" + rockSamples;
      break;
    case "1":
      ...
  }
  label = parseInt(elem.id);
  const img = webcam.capture();
  dataset.addExample(mobilenet.predict(img), label);
}
ฟังก์ชัน predict() จะวนลูป เก็บรูปจาก webcam.capture() ส่งให้โมเดล Headless MobileNet ทำการ predict แล้วส่งให้โมเดล Head Model ทำการ predict ต่อเป็น 1 ใน 3 (Class Rock-Paper-Scissors) เมื่อเสร็จแล้วก็ dispose ทำลาย Object ที่ไม่ใช้แล้ว และสั่ง tf.nextFrame() ให้ Web Browser ทำงานต่อ
async function predict() {
  while (isPredicting) {
    const predictedClass = tf.tidy(() => {
      const img = webcam.capture();
      const activation = mobilenet.predict(img);
      const predictions = model.predict(activation);
      return predictions.as1D().argMax();
    });
    const classId = (await predictedClass.data())[0];
    ...
    predictedClass.dispose();
    await tf.nextFrame();
  }
}
เมื่อเริ่มต้นโหลดหน้าเว็บ จะเรียกฟังก์ชัน init() ที่จะสั่งให้ Web Broser Setup Webcam และโหลดโมเดล MobileNet เตรียมไว้ก่อนเลย เวลาจะเทรนจริงจะได้ไม่เสียเวลารอ
async function init() {
  await webcam.setup();
  mobilenet = await loadMobilenet();
  tf.tidy(() => mobilenet.predict(webcam.capture()));
}
init();
webcam.js
โค้ด JavaScript สำหรับจัดการ Webcam รันใน Web Browser จาก Google
class Webcam {
  capture() {}
  async setup() {}
}
rps-dataset.js
โค้ดสำหรับจัดการ Rock-Paper-Scissors Dataset
class RPSDataset {
  addExample(example, label) {}
  encodeLabels(numClasses) {}
}
เรามาเริ่มกันเลยดีกว่า
Collect Data
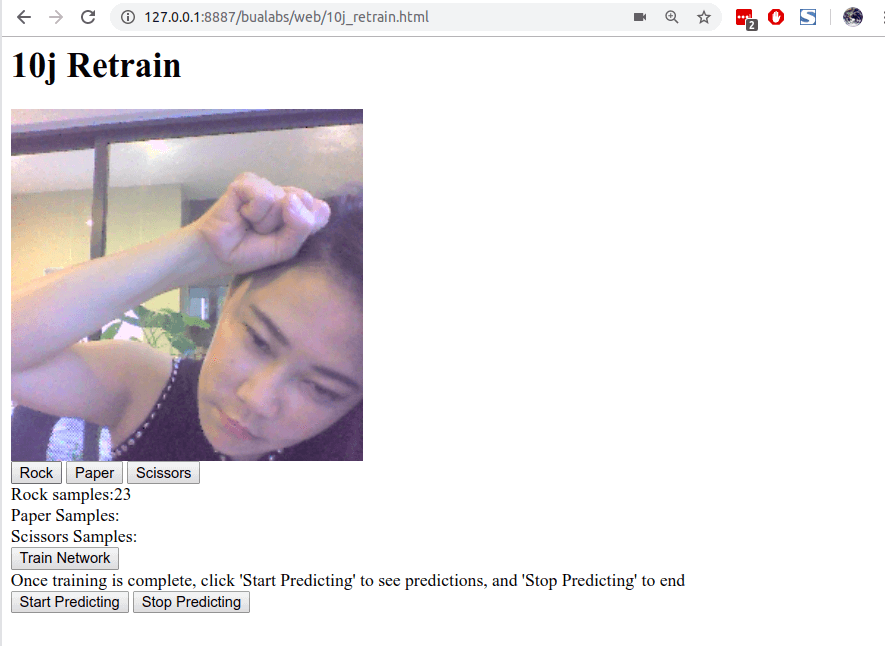
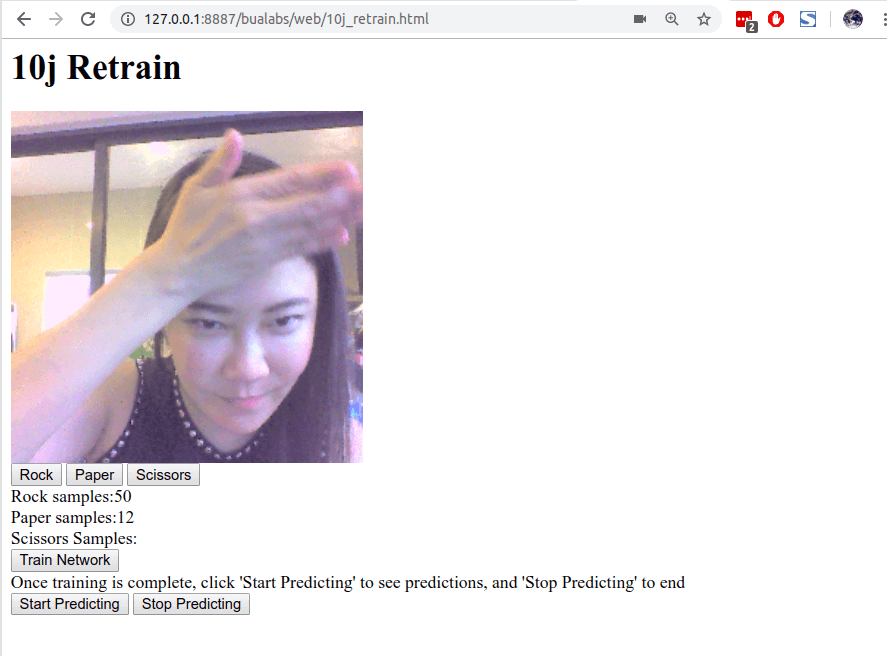
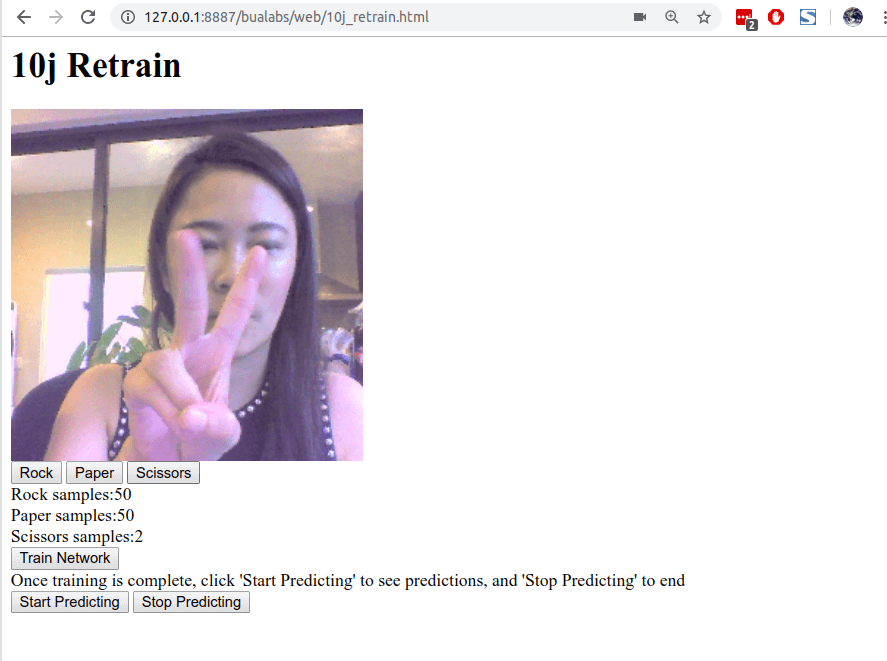
เปิดหน้าเว็บขึ้นมา งานแรกของเราคือ เก็บภาพข้อมูลตัวอย่างของทั้ง 3 Class ได้แก่ ฆ้อน Rock, กรรไกร Scissors และ กระดาษ Paper
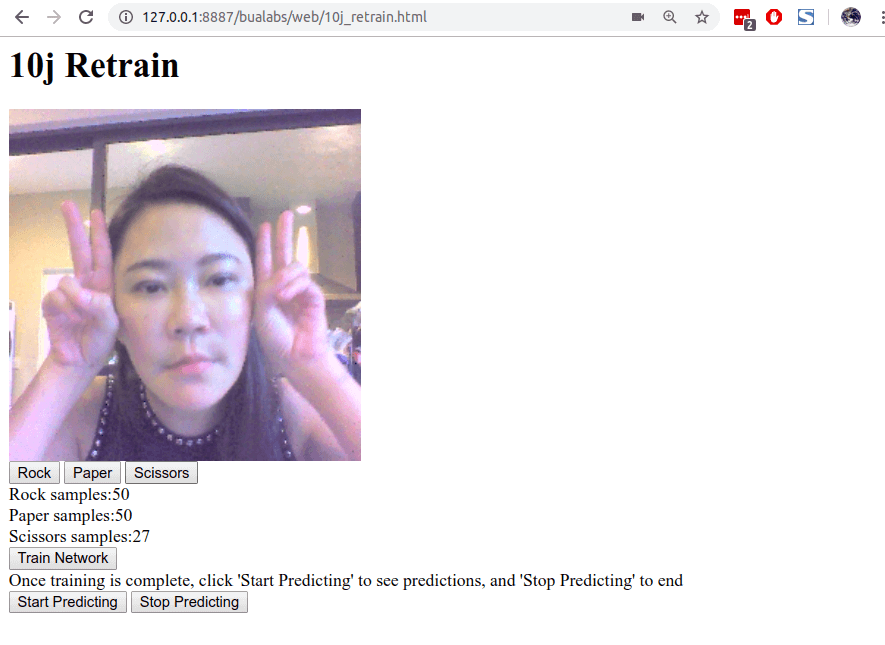
กดปุ่ม Rock, Paper หรือ Scissors เพื่อจับภาพ Class ที่ต้องการ ลงใน Dataset ข้อมูลตัวอย่าง อย่างน้อย Class ละ 50-60 ตัวอย่าง
Training
กดปุ่ม F12 เพื่อเปิด Console ดู log แล้วกดปุ่ม Train Network โมเดลจะทำงานด้วยข้อมูลใน Dataset ผ่าน Headless MobileNet และ Head ที่เราสร้างขึ้นมา แต่จะเทรนเฉพาะ Head โมเดลเท่านั้น
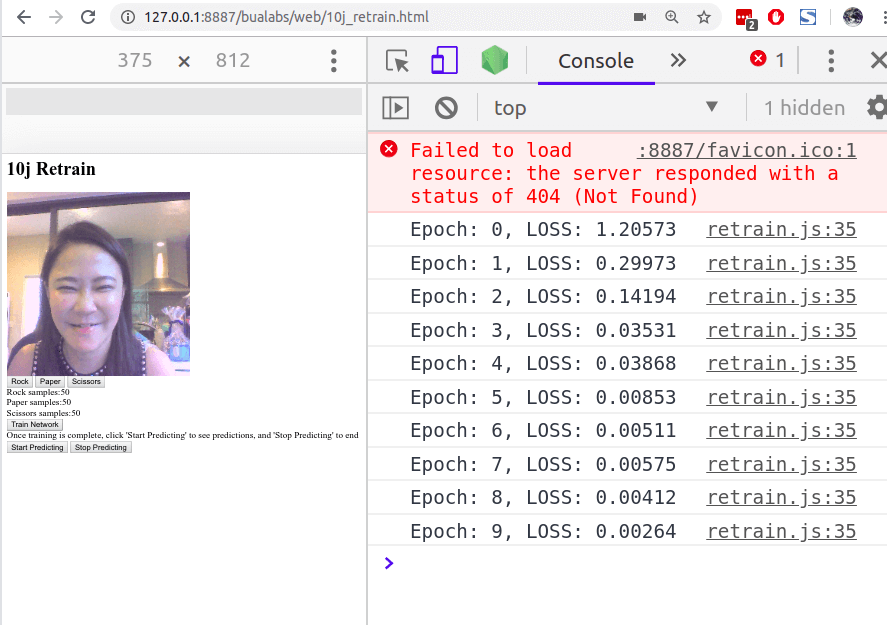
เทรนโมเดลไป จำนวน 10 Epoch จะเห็นว่า Loss ลดลงเรื่อย ๆ
Inference
เราสามารถใช้โมเดล ที่เราเพิ่งจะ Retrain เสร็จ ด้วยการกดปุ่ม Start Predicting แล้วจะเริ่ม predict แบบ Real-Time จากภาพในกล้อง Webcam
ให้เราลองทำมือเป็นรูปร่างทั้ง 3 Class ดูว่าโมเดลจะ Inference ถูกต้องหรือไม่
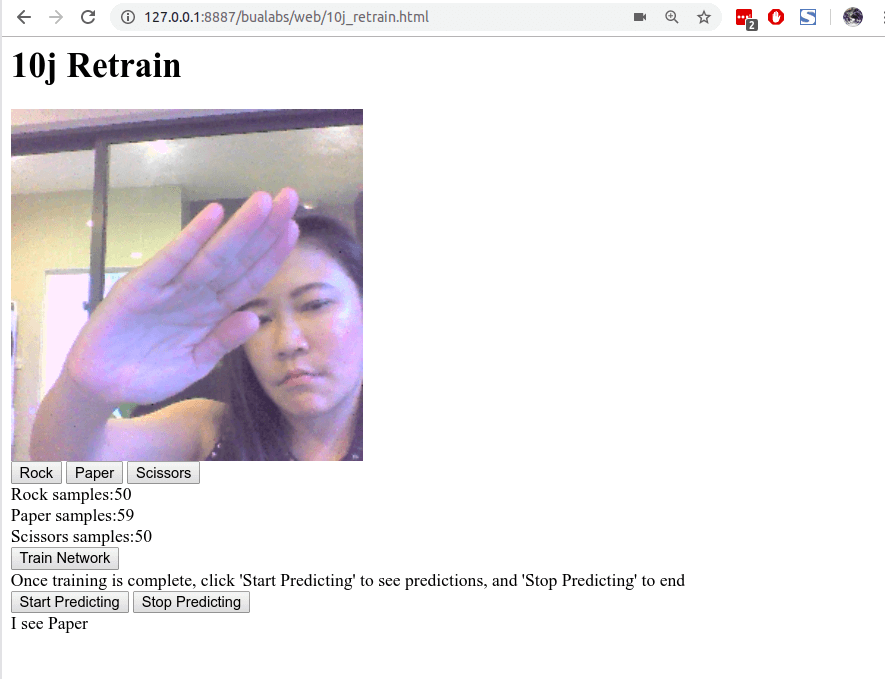

Model Predict Paper. 10j Retrained MobileNet classify image from Webcam 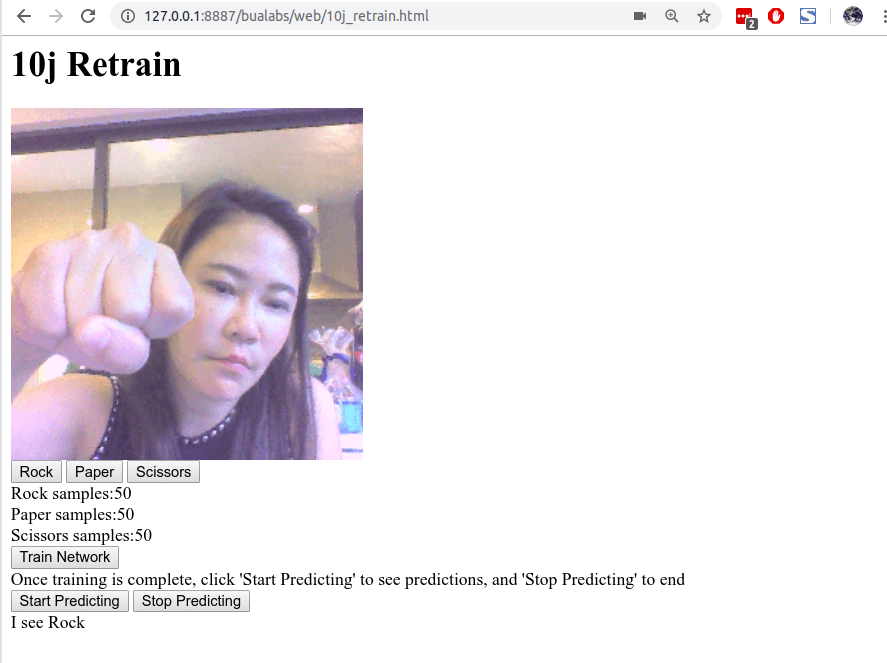

Model Predict Rock. 10j Retrained MobileNet classify image from Webcam 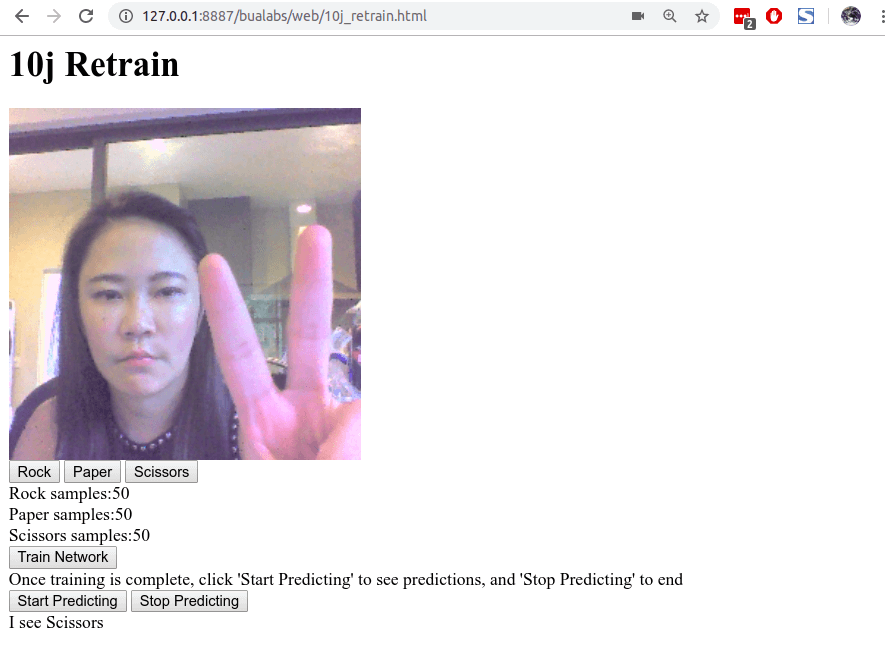

Model Predict Scissors. 10j Retrained MobileNet classify image from Webcam
Credit
- https://www.coursera.org/learn/browser-based-models-tensorflow
- http://cs231n.github.io/transfer-learning/
- https://js.tensorflow.org/api/latest/#data.webcam
- https://arxiv.org/abs/1704.04861
- https://github.com/tensorflow/tfjs-models/tree/master/mobilenet
- http://www.image-net.org/