ใน ep นี้เราจะสร้าง Convolutional Neural Network (ConvNet, CNN) ด้วย TensorFlow.js สำหรับจำแนกรูปภาพ ตัวเลขลายมือ MNIST Dataset ทำ Visualization ด้วย tfvis และนอกจากนั้นเราจะเรียนรู้เทคนิค Sprite Sheet ที่จะช่วยแก้ปัญหาดาวน์โหลดข้อมูลใหม่ทุก Epoch ที่เราพบใน ep ที่แล้ว
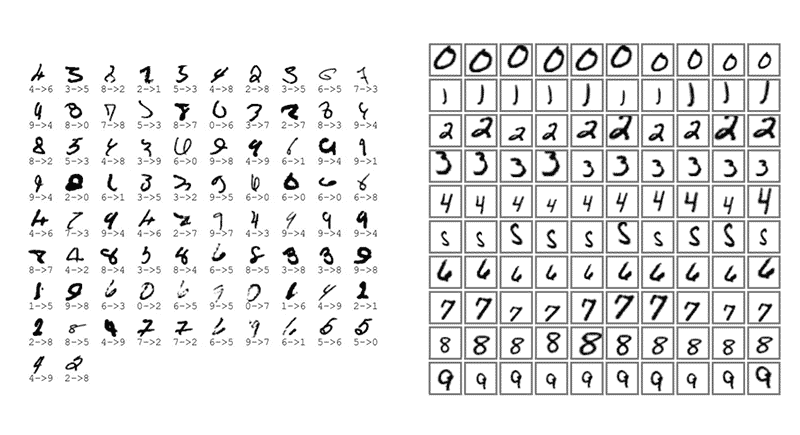
MNIST Dataset
Sprite Sheet คืออะไร
จาก ep ที่แล้ว ที่โมเดลของเรา ส่ง HTTP Request ไปดาวน์โหลดข้อมูลใหม่ทุก Epoch เราจะแก้ปัญหาโดยรวมข้อมูลทั้งหมดเป็นรูปเดียว ดาวน์โหลดมาทีเดียว แล้วมาตัดแบ่งใช้เป็นส่วน ๆ
เทคนิคนี้เรียกว่า Sprite Sheet เป็นเทคนิคที่ถูกใช้อย่างแพร่หลายในการพัฒนาเกมส์
TensorFlow.js Code Example
10d_mnist_classifier.html
เริ่มต้นด้วยใส่ Code ด้านล่าง ไว้ระหว่าง HTML tag head และ body โค้ดนี้เป็นการ Load TensorFlow.js และ tfjs-vis ที่ใช้ในการแสดงผลการทำงานภายในโมเดล
    <script src="https://cdn.jsdelivr.net/npm/@tensorflow/tfjs@latest"></script>
    <script src="https://cdn.jsdelivr.net/npm/@tensorflow/tfjs-vis"></script>
ใส่ HTML5 canvas สำหรับวาดภาพ ขนาด 280 x 280 ซึ่งใหญ่เป็น 10 เท่าของ MNIST จะได้ Resize ได้ง่าย และรูปภาพ img สำหรับ Save ข้อมูลจาก Canvas
            <canvas id="canvas" width="280" height="280" style="position:absolute;top:100;left:100;border:8px solid;"></canvas>
            <img id="canvasimg" style="position:absolute;top:10%;left:52%;width=280;height=280;display:none;" />
สร้างปุ่ม Classify และ Clear รูป
            <input type="button" value="classify" id="sb" size="48" style="position:absolute;top:400;left:100;">
            <input type="button" value="clear" id="cb" size="48" style="position:absolute;top:400;left:180;">
ในเคสนี้ เราจะเขียนโปรแกรมในไฟล์ภายนอก script.js ไม่ได้เขียนในไฟล์ HTML หลัก
        <script src="js/data.js" type="module"></script>
        <script src="js/script.js" type="module"></script>
data.js
จะบรรจุโค้ดที่ใช้ในการจัดการ MNIST Dataset Sprite Sheet ประกอบด้วย method สำหรับโหลดข้อมูลรูปภาพ และ ข้อมูล Label จาก URL ที่กำหนด มา Slice ตัด และสร้าง Tensor ใน Shape ตาม Batch Size ที่กำหนด
export class MnistData {
  async load() {}
  nextTrainBatch(batchSize) {}
  nextTestBatch(batchSize) {}
}
script.js
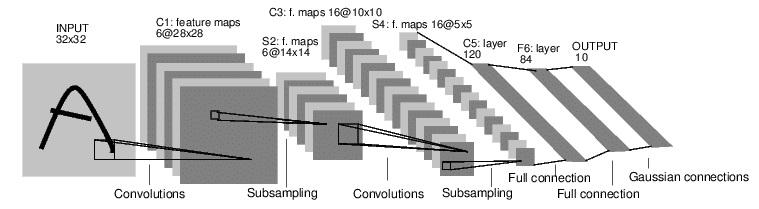
ประกาศฟังก์ชัน สร้าง Convolutional Neural Network ขนาด 5 Hidden Layer ที่มี Output 10 Class, ใช้ Categorical Cross Entropy Loss เนื่องจากเป็น Multi-Class Classification, ใช้ Adam Optimizer ด้วย Default Learning Rate และ Accuracy Metrics
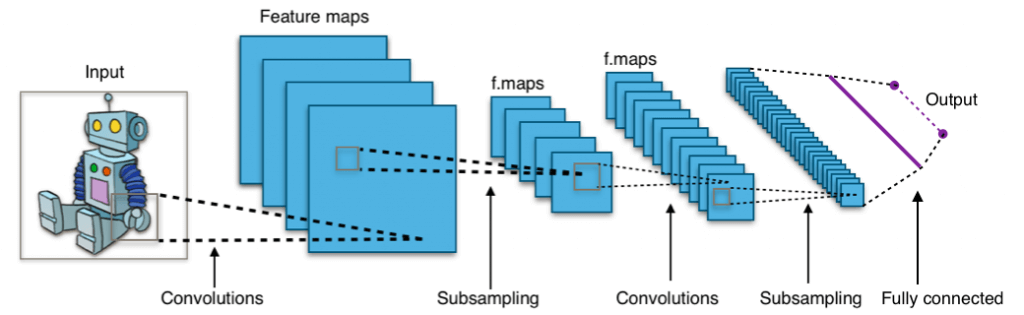
function getModel() {
	model = tf.sequential();

	model.add(tf.layers.conv2d({inputShape: [28, 28, 1], kernelSize: 3, filters: 8, activation: 'relu'}));
	model.add(tf.layers.maxPooling2d({poolSize: [2, 2]}));
	model.add(tf.layers.conv2d({filters: 16, kernelSize: 3, activation: 'relu'}));
	model.add(tf.layers.maxPooling2d({poolSize: [2, 2]}));
	model.add(tf.layers.conv2d({filters: 32, kernelSize: 3, activation: 'relu'}));
	model.add(tf.layers.flatten());
	model.add(tf.layers.dense({units: 128, activation: 'relu'}));
	model.add(tf.layers.dense({units: 10, activation: 'softmax'}));

	model.compile({optimizer: tf.train.adam(), loss: 'categoricalCrossentropy', metrics: ['accuracy']});
	return model;
}
ประกาศฟังก์ชันเทรน ที่ทำหน้าที่แปลง Tensor แล้ว reshape ให้อยู่ในมิติ ที่โมเดลต้องการ แล้ว fit ด้วยข้อมูลจาก Training Set ตามขนาด Batch Size ที่กำหนด แล้วคำนวน Metrics ด้วยข้อมูลจาก Validation Set
สำหรับโปรแกรมที่รันบน Web Browser เราไม่สามารถใช้ Resource สิ้นเปลืองได้เหมือนตอนเขียนภาษา Python ที่รันบนเครื่อง Server tf.tidy() จะรันฟังก์ชันที่ได้รับ และหลังจากรันเสร็จ ก็จะทำลาย Tensor ที่ใช้แล้ว แต่ไม่ได้ return ทิ้งไปให้หมด เพื่อประหยัด Memory
เรียก model.fit() เทรนไป 20 Epoch ระหว่างเทรนให้ Shuffle ข้อมูล และ callback ไปยัง tfvis ที่จะแสดง Visualization ข้อมูลภายในโมเดล
async function train(model, data) {
	const fitCallbacks = tfvis.show.fitCallbacks(container, metrics);
	const [trainXs, trainYs] = tf.tidy(() => {
		const d = data.nextTrainBatch(TRAIN_DATA_SIZE);
		return [
			d.xs.reshape([TRAIN_DATA_SIZE, 28, 28, 1]),
			d.labels
		];
	});
	...
	return model.fit(trainXs, trainYs, {
		batchSize: BATCH_SIZE,
		validationData: [testXs, testYs],
		epochs: 20,
		shuffle: true,
		callbacks: fitCallbacks
	});
}
ฟังก์ชันที่เกี่ยวกับการวาดรูปบน HTML canvas, การ Bind Event ในการคลิกเมาส์วาดเส้น และการเคลียร์รูปภาพ
function setPosition(e) {}
function draw(e) {}
function erase() {}
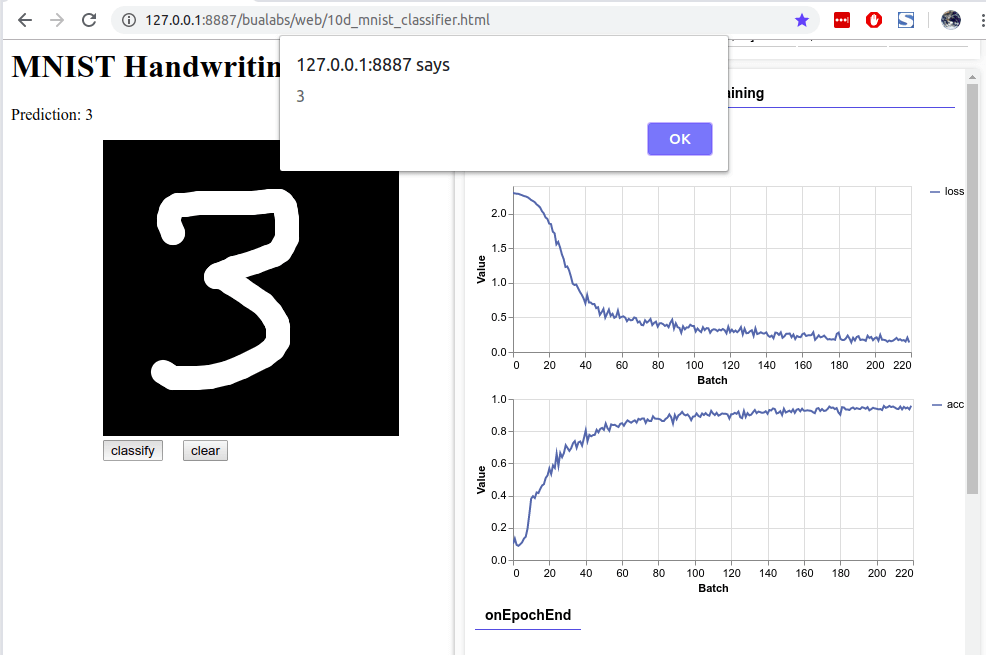
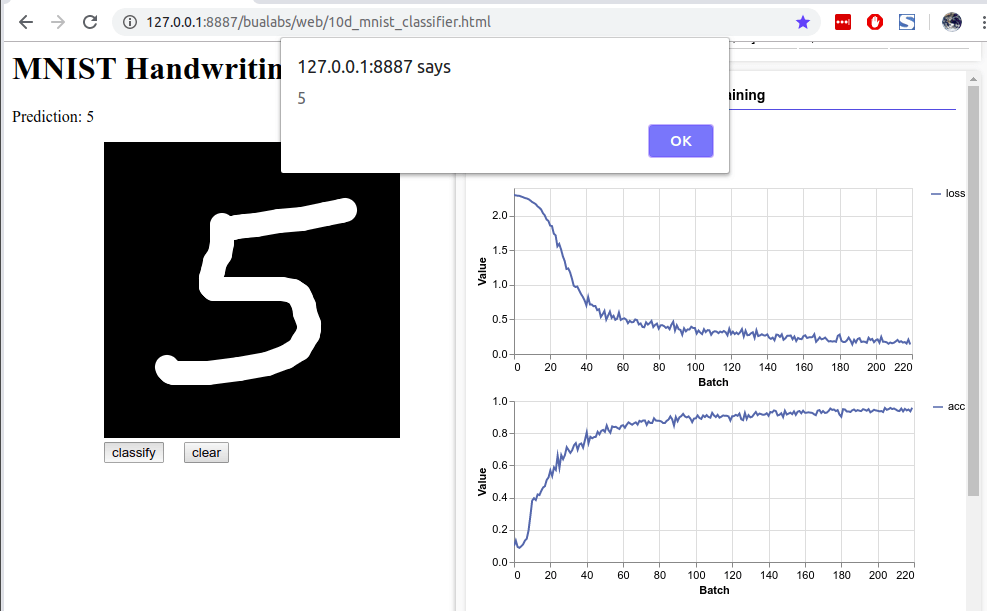
function init() {}สำหรับการ Prediction จะอยู่ใน ฟังก์ชัน save() ที่จะเซฟรูปออกมาจาก canvas image และ resize, reshape ให้เป็น Batch Size = 1 เพื่อส่งให้โมเดล predict แล้วนำผลลัพธ์มาแสดงออกทางหน้าจอ
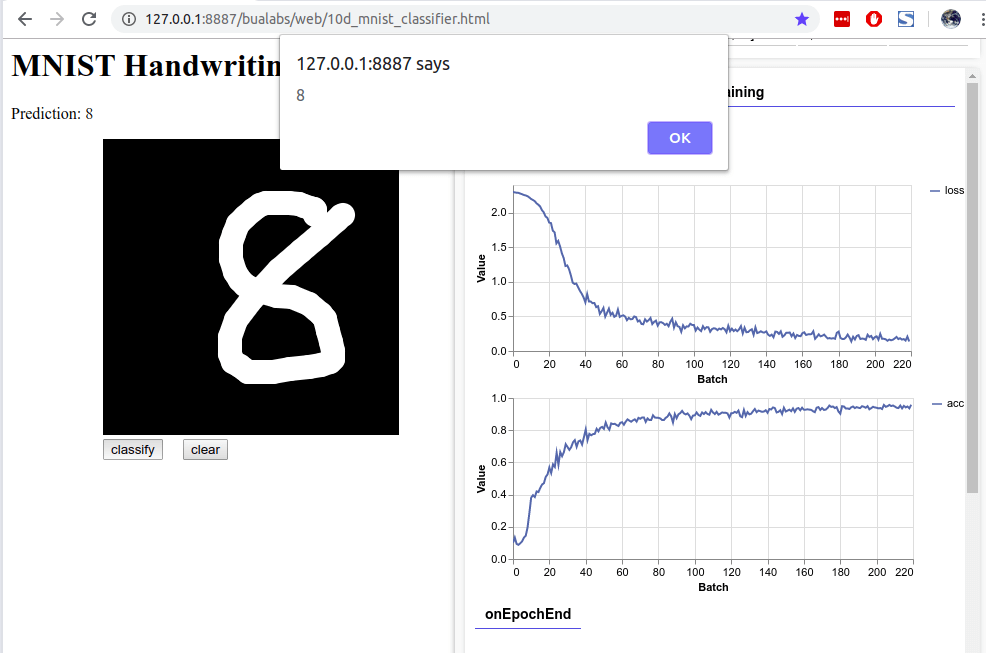
function save() {
	var raw = tf.browser.fromPixels(rawImage, 1);
	var resized = tf.image.resizeBilinear(raw, [28, 28]);
	var tensor = resized.expandDims(0);
	var prediction = model.predict(tensor);
	var pIndex = tf.argMax(prediction, 1).dataSync();

	pred.innerHTML = "Prediction: " + pIndex
	alert(pIndex);
}
และสุดท้ายเมื่อโหลด HTML เสร็จ ฟังก์ชัน run() จะเรียกฟังก์ชันด้านบน เรียงตามลำดับ เริ่มตั้งแต่โหลด Data, โหลด Model, แสดง tfvis Visor, เริ่มต้นเทรน Model และ init() ค่า Bind Event สำหรับ canvas และปุ่มต่าง ๆ เมื่อเสร็จสิ้น ก็ Alert ข้อความแจ้ง User
async function run() {
	const data = new MnistData();
	await data.load();
	const model = getModel();
	tfvis.show.modelSummary({name: "Model Architecture"}, model);
	await train(model, data);
	init();
	alert("Finished training. Now you can try to classify your handwriting.")
}
document.addEventListener("DOMContentLoaded", run);
เรามาเริ่มกันเลยดีกว่า
js/data.js จาก Google
Training
Model Architecture
เริ่มต้นเทรน เมื่อเปิดหน้าเว็บ จะเห็นหน้าจอ มี Visor Panel ด้านขวา ดังนี้
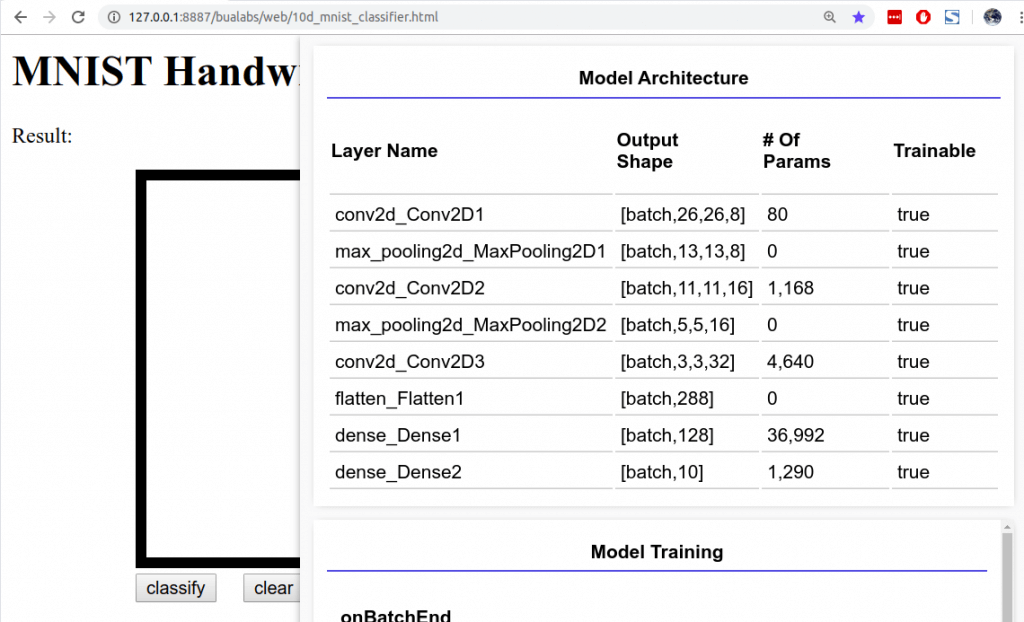
- Model Architecture สังเกตว่า มี
- 3 Convolutional Layer
- 2 Max Pooling Layer
- 1 Flatten Layer
- 2 Dense Layer ที่มี Output 10 Class
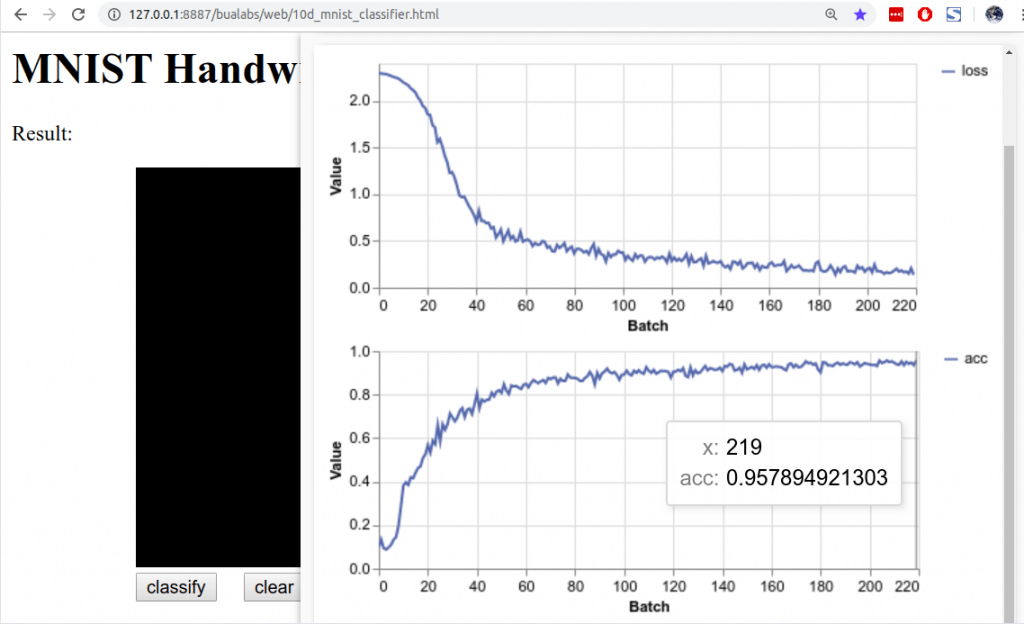
Loss and Accuracy onBatchEnd
กราฟนี้จะอัพเดททุก Batch ทำให้เราเห็นกราฟขรุขระขึ้นลงไม่เรียบ ขึ้นอยู่กับขนาด Batch Size
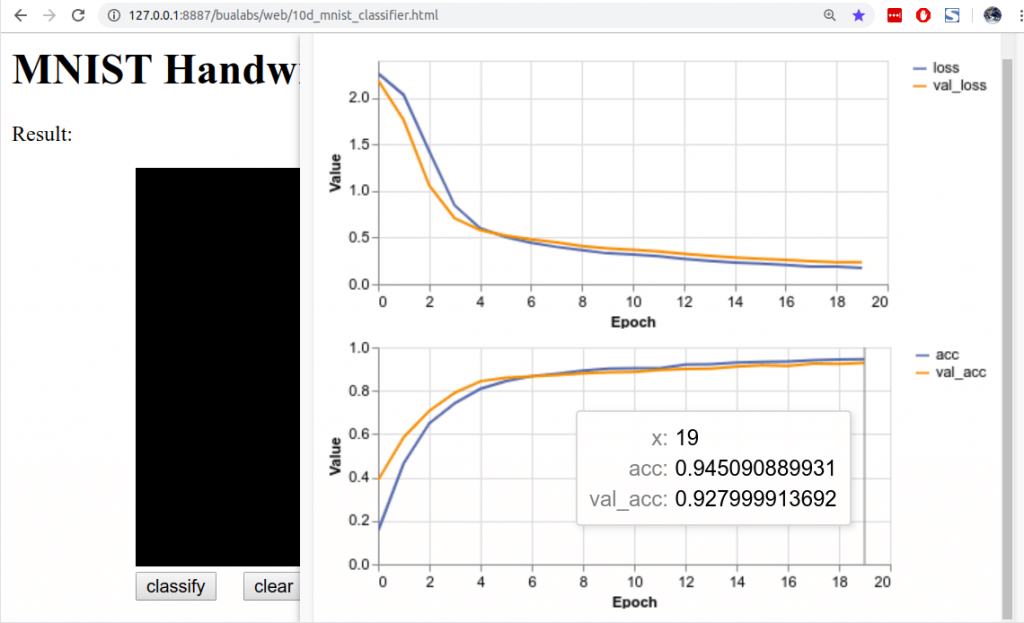
Training and Validation Loss / Accuracy
Loss ลดลงเรื่อย ๆ ทั้ง Training / Validation และ Accuracy ก็สูงขึ้นเรื่อย ๆ ถึงประมาณ val_acc = 93%
Inference
เราจะใช้เม้าส์วาดตัวเลขบน Canvas แล้ว กดปุ่ม Classify ให้โมเดล Predict
Credit
- https://www.coursera.org/learn/browser-based-models-tensorflow
- http://yann.lecun.com/exdb/mnist/
- https://js.tensorflow.org/api/latest/
- https://js.tensorflow.org/api_vis/1.3.0/