ใน ep นี้ เราจะสอน สร้างแอพ Android เขียน App AI บนมือถือ ที่มีความสามารถ Image Classification ด้วย TensorFlow Lite โดยใช้ Transfer Learning โมเดล Inception v3 มาเป็น Feature Extractor และเพิ่ม Custom Head 3 Class มา Convert ประกอบเป็น App สำหรับรันบนมือถือ Android ด้วยภาษา Kotlin
สอนเขียน App มือถือ Image Classification ด้วย Transfer Learning
เราสามารถพัฒนา App บนมือถือ Android ให้มีความสามารถด้าน AI / Machine Learning มีฟังก์ชัน Image Classification จากรูป ที่ถ่ายจากกล้องมือถือ แบบ Real-time ด้วยโมเดลของเราเอง ที่ทำ Transfer Learning มาจาก Inception v3 เพิ่ม Custom Head 3 Class ได้แก่ Rock ฆ้อน, Paper กระดาษ และ Scissors กรรไกร
ขั้นตอนการสร้างแอพพลิเคชั่น จะเป็นดังนี้
- Transfer Learning บน Server (ในที่นี้คือ Notebook / Colab)
- Export to SavedMovel และ Convert to FlatBuffer ไฟล์ .tflite
- Download นำไปใส่ใน App
- เขียน App เตรียมข้อมูล Input/Output ตามที่โมเดลต้องการ
เรามาเริ่มกันเลยดีกว่า ขั้นที่ 1-2
Copyright 2018 The TensorFlow Authors.
#@title Licensed under the Apache License, Version 2.0 (the "License");
# you may not use this file except in compliance with the License.
# You may obtain a copy of the License at
#
# https://www.apache.org/licenses/LICENSE-2.0
#
# Unless required by applicable law or agreed to in writing, software
# distributed under the License is distributed on an "AS IS" BASIS,
# WITHOUT WARRANTIES OR CONDITIONS OF ANY KIND, either express or implied.
# See the License for the specific language governing permissions and
# limitations under the License.
0. Setup
Uninstall TensorFlow เวอร์ชันที่อยู่ใน Colab, Install Version nightly แล้ว Restart Runtime
# !pip3 uninstall tensorflow
# !pip3 install tf-nightly
ใน ep นี้ เราจะใช้ TensorFlow 2 ด้วยคำสั่ง Magic %tensorflow_version 2.x (สำหรับ Google Colab)
try:
%tensorflow_version 2.x
except:
pass
1. Import
1.1 Import Library
Import Library ที่เกี่ยวข้อง และ Print เลข Version
import numpy as np
import matplotlib.pylab as plt
import tensorflow as tf
import tensorflow_hub as hub
import tensorflow_datasets as tfds
tfds.disable_progress_bar()
from tqdm import tqdm
print("\u2022 Using TensorFlow Version:", tf.__version__)
print("\u2022 Using TensorFlow Hub Version: ", hub.__version__)
# print('\u2022 GPU Device Found.' if tf.test.is_gpu_available() else '\u2022 GPU Device Not Found. Running on CPU')
tf.config.list_physical_devices('GPU')
1.2 เลือกโมดูล
เลือกโมดูล TensorFlow 2 ที่ต้องการจาก TensorFlow Hub
module_selection = ("inception_v3", 299, 2048) #@param ["(\"mobilenet_v2\", 224, 1280)", "(\"inception_v3\", 299, 2048)"] {type:"raw", allow-input: true}
handle_base, pixels, FV_SIZE = module_selection
MODULE_HANDLE ="https://tfhub.dev/google/tf2-preview/{}/feature_vector/4".format(handle_base)
IMAGE_SIZE = (pixels, pixels)
print("Using {} with input size {} and output dimension {}".format(MODULE_HANDLE, IMAGE_SIZE, FV_SIZE))
2. Dataset
2.1 Split Data to Training / Validation / Test Set
เราจะใช้ TensorFlow Dataset tfds
โหลดชุดข้อมูล เป่ายิ้งฉุบ Rock Paper Scissors Dataset ขึ้นมา แล้ว Split Training / Validation / Test Set ด้วยสัดส่วน 80/10/10
splits = tfds.Split.ALL.subsplit(weighted=(80, 10, 10))
# Go to the TensorFlow Dataset's website and search for the Rock, Paper, Scissors dataset and load it here
splits, info = tfds.load('rock_paper_scissors', with_info=True, as_supervised=True, split = splits)
(train_examples, validation_examples, test_examples) = splits
num_examples = info.splits['train'].num_examples
num_classes = info.features['label'].num_classes
num_examples, num_classes
จะได้ Dataset ที่มีข้อมูล 2520 ตัวอย่าง มี 3 Class
2.2 Transform
ประกาศฟังก์ชัน ใช้ tf.image
เพื่อแปลงรูปใน Dataset ให้อยู่ในรูปแบบที่โมเดลต้องการ ในที่นี้คือ Resize เป็นขนาดที่กำหนด และ Rescale ค่าสี จาก 0-255 หาร 255 ให้เป็น Float 0-1
def format_image(image, label):
image = tf.image.resize(image, IMAGE_SIZE) / 255.0
return image, label
กำหนดขนาด Batch Size ให้ DataLoader
BATCH_SIZE = 32 #@param {type:"integer"}
Shuffle สับไพ่ข้อมูล และแบ่งข้อมูลเป็น Batch ตาม Batch Size ที่กำหนดด้านบน
# Prepare the examples by preprocessing the them and then batching them (and optionally prefetching them)
train_batches = train_examples.shuffle(num_examples//4).batch(BATCH_SIZE).map(format_image).prefetch(1)
validation_batches = validation_examples.batch(BATCH_SIZE).map(format_image).prefetch(1)
test_batches = test_examples.batch(1).map(format_image)
ดู shape ของข้อมูล 1 Batch จะได้ Batch Size = 32, Wigth = 299, Height = 299, Channels = 3
for image_batch, label_batch in train_batches.take(1):
pass
image_batch.shape
ดูรูปตัวอย่าง
fig, axs = plt.subplots(1, 4, figsize=(12, 3))
for i in range(4):
axs[i].imshow(image_batch[i])
plt.show()
3. Model
เราทำ Transfer Learning ด้วยการสร้าง 1 Dense Layer จาก Linear Classifier เป็น Head ต่อจาก feature_extractor_layer ของโมเดลที่โหลดมาจาก TensorFlow Hub
3.1 Fine-Tuning
เราสามารถกำหนดได้ว่า จะเทรน Fune-Tuning ทั้งโมเดลเลยหรือไม่ เพื่อเพิ่มความแม่นยำ หรือเทรนแค่ Head Layer สุดท้ายที่สร้างใหม่ก็พอ เพื่อประหยัดเวลา
do_fine_tuning = False #@param {type:"boolean"}
3.2 Pre-trained Model
ใช้ TensorFlow Hub โหลดโมเดล Pre-trained ที่เลือกด้านบนขึ้นมา กำหนด Hyperparameter ของโมเดล เช่น Input / Output Shape, Freeze โมเดลหรือไม่
feature_extractor = hub.KerasLayer(MODULE_HANDLE,
input_shape=IMAGE_SIZE + (3,),
output_shape=[FV_SIZE],
trainable=do_fine_tuning)
3.3 Pre-trained Feature Extractor + Custom Head
สร้าง Head ด้วย 1 Dense Layer ที่มี Activation Function เป็น Softmax และใส่ Dropout คั้นไว้จะได้ไม่ Overfit
print("Building model with", MODULE_HANDLE)
model = tf.keras.Sequential([
feature_extractor,
tf.keras.layers.Dropout(0.5),
tf.keras.layers.Dense(num_classes, activation='softmax')
])
model.summary()
3.4 Unfreeze Layers
ในกรณีต้องการ Fine-Tuning เราสามารถเลือกได้ว่าจะ Unfreeze ถึง Layer ไหน เพื่อเทรนจาก Layer ท้ายสุดมาหน้า
#@title (Optional) Unfreeze some layers
NUM_LAYERS = 4 #@param {type:"slider", min:1, max:50, step:1}
if do_fine_tuning:
feature_extractor.trainable = True
for layer in model.layers[-NUM_LAYERS:]:
layer.trainable = True
else:
feature_extractor.trainable = False
3.5 Compile Model
if do_fine_tuning:
model.compile(optimizer=tf.keras.optimizers.SGD(lr=0.002, momentum=0.9),
loss=tf.keras.losses.SparseCategoricalCrossentropy(),
metrics=['accuracy'])
else:
model.compile(optimizer='adam',
loss='sparse_categorical_crossentropy',
metrics=['accuracy'])
4. Training the Model
เทรนไป 5 Epoch
EPOCHS = 5
hist = model.fit(train_batches,
epochs=EPOCHS,
validation_data=validation_batches)
5. Export the Model
Export โมเดลที่เทรนเสร็จเรียบร้อยแล้ว ในรูปแบบ ไฟล์ SavedModel Format
RPS_SAVED_MODEL = "rps_saved_model"
# Use TensorFlow's SavedModel API to export the SavedModel from the trained Keras model
tf.saved_model.save(model, export_dir=RPS_SAVED_MODEL)
ดูรายละเอียดของโมเดล ในไฟล์ SavedModel
%%bash -s $RPS_SAVED_MODEL
saved_model_cli show --dir $1 --tag_set serve --signature_def serving_default
ลองโหลดโมเดลขึ้นมาดู
loaded = tf.saved_model.load(RPS_SAVED_MODEL)
ดู Signature Input / Output Shape
print(list(loaded.signatures.keys()))
infer = loaded.signatures["serving_default"]
print(infer.structured_input_signature)
print(infer.structured_outputs)
6. Convert ไฟล์โมเดลด้วย TFLite Converter
ใช้ TFLiteConverter โหลดไฟล์โมเดล SavedModel ที่เรา Export ไว้ด้านบน
เราจะ Optimize โมเดล ด้วยการทำ Post-Training Quantization ลดจำนวน Bit ของ Parameter ในโมเดลลง เพื่อให้โมเดลมีขนาดเล็กลง และทำงานได้เร็วขึ้น จะอธิบายต่อไป ในเรื่อง Quantization
เราสามารถเลือกได้ว่า จะให้ Optimize เพื่อ Latency, Size หรือ ทั้งสองอย่าง (Default)
6.1 TensorFlow v1
# converter = tf.compat.v1.lite.TFLiteConverter.from_saved_model(RPS_SAVED_MODEL)
# converter.inference_type = tf.lite.constants.QUANTIZED_UINT8
# input_arrays = converter.get_input_arrays()
# converter.quantized_input_stats = {input_arrays[0] : (0., 1.)} # mean, std_dev
# tflite_model = converter.convert()
6.2 TensorFlow v2
# Intialize the TFLite converter to load the SavedModel
converter = tf.lite.TFLiteConverter.from_saved_model(RPS_SAVED_MODEL)
converter.experimental_new_converter = True
# Set the optimization strategy for 'size' in the converter
# converter.optimizations = [tf.lite.Optimize.OPTIMIZE_FOR_SIZE]
converter.optimizations = [tf.lite.Optimize.DEFAULT]
นอกเหนือจาก Parameter เราสามารถ Quantize ข้อมูล และ Activation ได้อีก โดยการให้ชุดข้อมูลตัวอย่าง รันผ่านโมเดล เพื่อเก็บสถิติ Representative Dataset วัด Dynamic Range ของข้อมูล และ Activation สร้าง Input Data Generator เพื่อส่งให้กับ Converter ใช้ในการทำ Post-Training Integer Quantization ต่อไป
## Still not working. Wait for TF team to fix bug in tflite converter
## Post-training integer quantization
# converter.target_spec.supported_ops = [tf.lite.OpsSet.TFLITE_BUILTINS_INT8]
# converter.inference_input_type = tf.uint8
# converter.inference_output_type = tf.uint8
# def representative_data_gen():
# for image_batch, label_batch in train_batches.take(1):
# yield [[image_batch[0]]]
# converter.representative_dataset = representative_data_gen
โมเดลที่แปลงแล้ว จะยังรับ Input / Output เป็น Float เหมือนเดิมเพื่อความสะดวก จะได้ไม่ต้องแก้โปรแกรม
และ ในโมเดล ถ้า Ops ไหน ที่ไม่มี Quantized Implementation ก็จะใช้เป็น Floating Point Implementation เหมือนเดิม แบบนี้จะทำให้การ Convert โมเดลทำได้อย่างราบรื่น แต่ก็จะจำกัดให้รันได้เฉพาะ Hardware ที่รองรับ Floating Point
6.3 Convert โมเดลเป็น ไฟล์ FlatBuffer .tflite
Convert โมเดลเป็นไฟล์ tflite แล้ว Save ลง Disk
# Use the tool to finally convert the model
tflite_model = converter.convert()
tflite_model_file = 'converted_model.tflite'
with open(tflite_model_file, "wb") as f:
f.write(tflite_model)
7. Test ไฟล์ tflite ด้วย TFLite Intepreter
ใช้ TFLite Intepreter โหลดไฟล์ tflite ขึ้นมา
# Load TFLite model and allocate tensors.
with open(tflite_model_file, 'rb') as fid:
tflite_model = fid.read()
interpreter = tf.lite.Interpreter(model_content=tflite_model)
interpreter.allocate_tensors()
input_index = interpreter.get_input_details()[0]["index"]
output_index = interpreter.get_output_details()[0]["index"]
ดู Signature ของโมเดล ดู Shape และ Type ของ Input และ Output
interpreter.get_input_details(), interpreter.get_output_details()
สุ่มเลือก 10 รูปจาก Test Set มาให้โมเดล ทำ Inference
# Gather results for the randomly sampled test images
predictions = []
test_labels, test_imgs = [], []
for img, label in tqdm(test_batches.take(10)):
interpreter.set_tensor(input_index, img)
interpreter.invoke()
predictions.append(interpreter.get_tensor(output_index))
test_labels.append(label.numpy()[0])
test_imgs.append(img)
นำผลลัพธ์ที่ได้ มาพล็อตแสดงรูป เปรียบเทียบ label และ prediction
#@title Visualize the outputs { run: "auto" }
index = 0 #@param {type:"slider", min:0, max:9, step:1}
plt.figure(figsize=(6,3))
plt.subplot(1,2,1)
plot_image(index, predictions, test_labels, test_imgs)
plt.show()
index = 3
plt.figure(figsize=(6,3))
plt.subplot(1,2,1)
plot_image(index, predictions, test_labels, test_imgs)
plt.show()
สร้างไฟล์เก็บ Label
with open('labels.txt', 'w') as f:
f.write('\n'.join(class_names))
8. Save และ Download ไฟล์ tflite
Save ไฟล์ และ Download โมเดล และ Label มาที่ Local Disk เพื่อนำไปใส่ Device ที่ต้องการต่อไป
หมายเหตุ: เราอาจจะต้อง กดอนุญาตให้ Web Browser สามารถ Download หลาย ๆ ไฟล์ได้พร้อมกัน
try:
from google.colab import files
files.download('converted_model.tflite')
files.download('labels.txt')
except:
pass
9. Credit
- https://www.coursera.org/learn/device-based-models-tensorflow/
- https://www.bualabs.com/archives/3595/what-is-tensorflow-lite-converter-convert-mobilenet-transfer-learning-classifier-head-deploy-mobile-iot-edge-device-microcontroller-tflite-ep-3/
- https://www.tensorflow.org/datasets/catalog/rock_paper_scissors
- https://github.com/lmoroney/dlaicourse/tree/master/TensorFlow%20Deployment
- https://www.tensorflow.org/lite/convert
เราจะ Download ได้ไฟล์ มา 2 ไฟล์ ชื่อว่า converted_model.tflite
และ labels.txt
TensorFlow Lite on Android Code Example ขั้นที่ 3-4
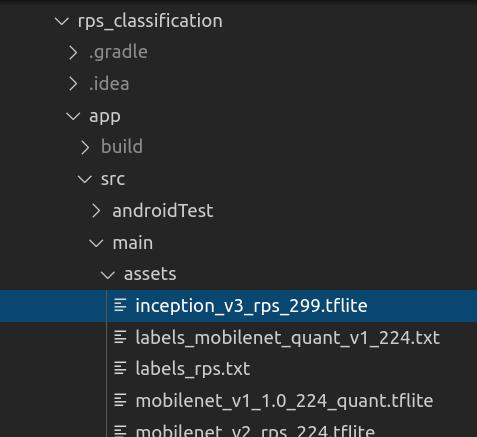
ให้นำไฟล์ FlatBuffer และ Label จำนวน 2 ไฟล์จากด้านบน ให้ Rename เป็น inception_v3_rps_299.tflite
และ labels.txt
แล้วไปใส่ไว้ใน Folder ของ App Android ชื่อ rps_classification/app/src/main/assets

ใน Project โค้ดตัวอย่างจะมีโครงสร้างเหมือนกับ tflite ep.6 แต่จะมีแตกต่างกันอยู่ตรงที่ขนาดของ Input/Output ของโมเดล และโมเดลนี้เป็นโมเดลที่รับ Float32 ไม่ใช่ Int8
Camera2BasicFragment.kt
ใน Camera2BasicFragment.kt เราจะกำหนดตัวเแปร mModelPath
ชื่อไฟล์ FlatBuffer, mLabelPath
ชื่อไฟล์ Label และกำหนด mInputSize
ขนาดกว้างยาวของรูป Input ให้ตรงกับโมเดล
private val mInputSize = 299 // Depend on model
// RPS Inception v3 299
private val mModelPath = "inception_v3_rps_299.tflite"
private val mLabelPath = "labels_rps.txt"
Classifier.kt
ใน Classifier.kt เราต้อง Allocate ByteBuffer
มากขึ้น 4 เท่า เนื่องจาก Int8 ใช้ 1 Byte แต่ Float32 ใช้ 4 Byte และใช้ putFloat()
แทน put()
private fun addPixelValue(byteBuffer: ByteBuffer, intValue: Int): ByteBuffer {
byteBuffer.putFloat((intValue.shr(16) and 0xFF).toFloat() / 256f)
byteBuffer.putFloat((intValue.shr(8) and 0xFF).toFloat() / 256f)
byteBuffer.putFloat((intValue and 0xFF).toFloat() / 256f)
return byteBuffer
}
private fun convertBitmapToByteBuffer(bitmap: Bitmap): ByteBuffer {
val imgData = ByteBuffer.allocateDirect( 4 * INPUT_SIZE * INPUT_SIZE * PIXEL_SIZE)
imgData.order(ByteOrder.nativeOrder())
val intValues = IntArray(INPUT_SIZE * INPUT_SIZE)
imgData.rewind()
bitmap.getPixels(intValues, 0, bitmap.width, 0, 0, bitmap.width, bitmap.height)
// Convert the image to floating point.
var pixel = 0
val startTime = SystemClock.uptimeMillis()
for (i in 0 until INPUT_SIZE) {
for (j in 0 until INPUT_SIZE) {
val `val` = intValues[pixel++]
addPixelValue(imgData, `val`)
}
}
return imgData;
}
ในฟังก์ชัน getSortedResult
ค่า confidence
ออกมาเป็น Float 0-1 อยู่แล้ว (ไม่ใช่ Int ที่ต้องหาร 255 ให้เป็นเ Float)
private fun getSortedResult(labelProbArray: Array<FloatArray>): List<Recognition> {
...
for (i in LABEL_LIST.indices) {
val confidence = labelProbArray[0][i]
if (confidence >= THRESHOLD) {
Log.d("confidence value:", "" + confidence);
pq.add(Recognition("" + i,
if (LABEL_LIST.size > i) LABEL_LIST[i] else "Unknown",
(confidence)
))
}
}
Build
Compile และ Build Project

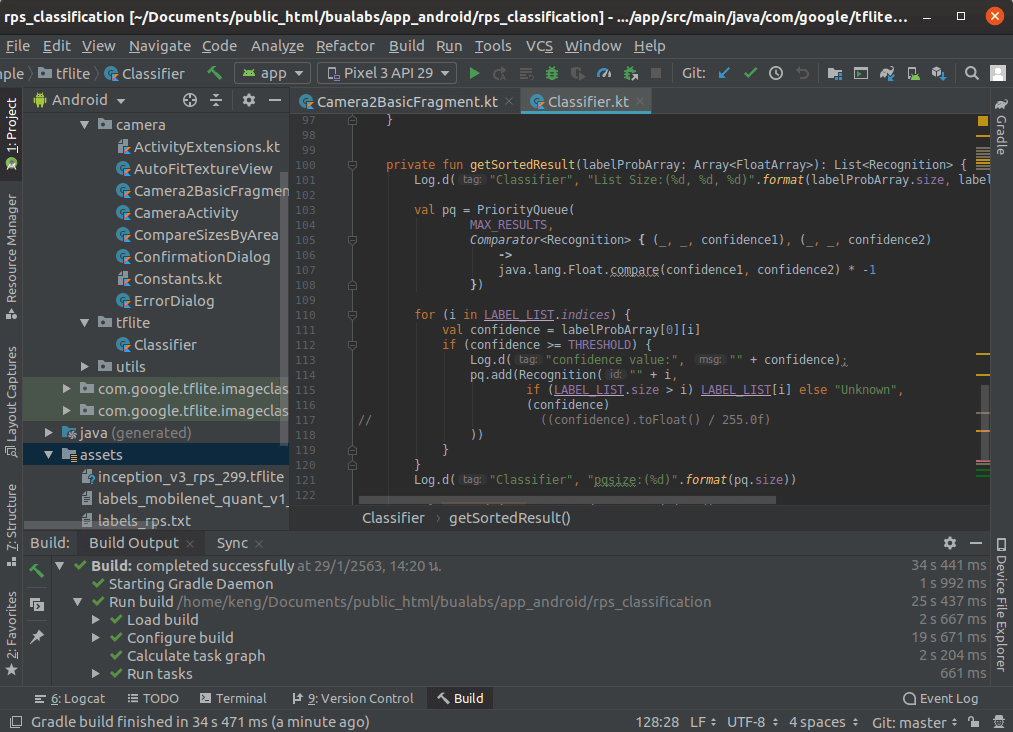
Run on Android Mobile Phone
Deploy บน มือถือ Android
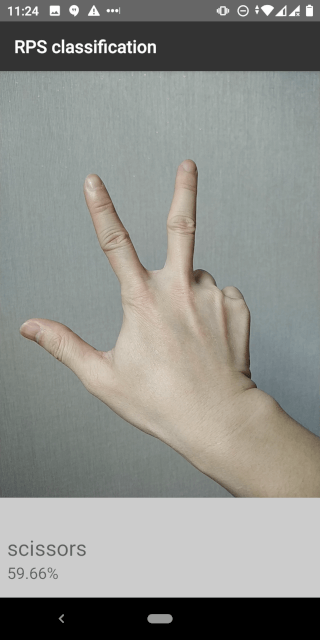
Scissors: rps classification app demo 12 
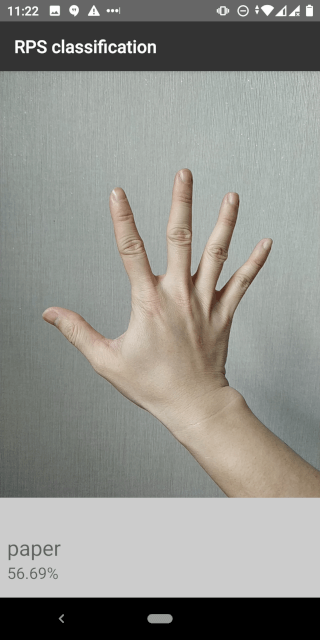
Paper: rps classification app demo 11 
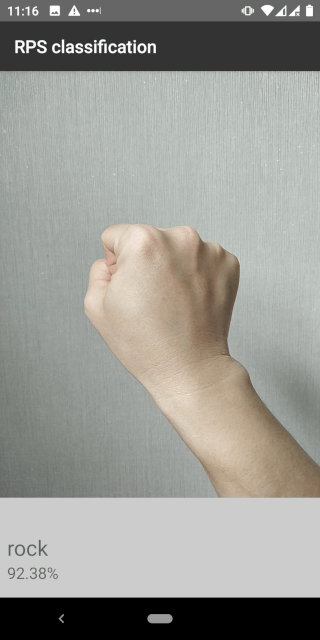
Rock: rps classification app demo 10
เนื่องจากใน RPS Dataset สภาพแสง พื้นหลัง และสีผิว อาจจะแตกต่างกับคนเอเชีย เราสามารถเก็บข้อมูลตัวอย่างเพิ่มเติม ไปใส่ Dataset แล้วเทรนต่อ เพื่อเพิ่มประสิทธิภาพความแม่นยำให้กับโมเดลได้